WildcatTTS reads your Twitch chat out loud on stream. This post walks through setting it up from nothing, and then through the three common ways streamers use it: reading only messages that start with !tts, reading every message, or reading only when someone spends bits or channel points.
You need a Twitch channel and OBS, or any streaming app with a browser source.
1. Get Access
WildcatTTS is invite-only. Send a request through the contact form with your Twitch username and I’ll approve the channel.
2. Sign In and Switch the Bot On
-
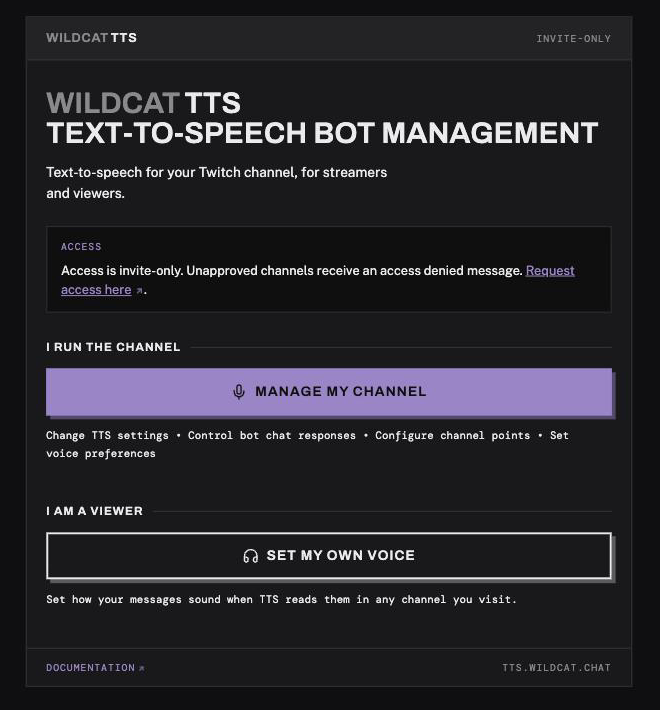
Go to tts.wildcat.chat and click Manage my channel.
-
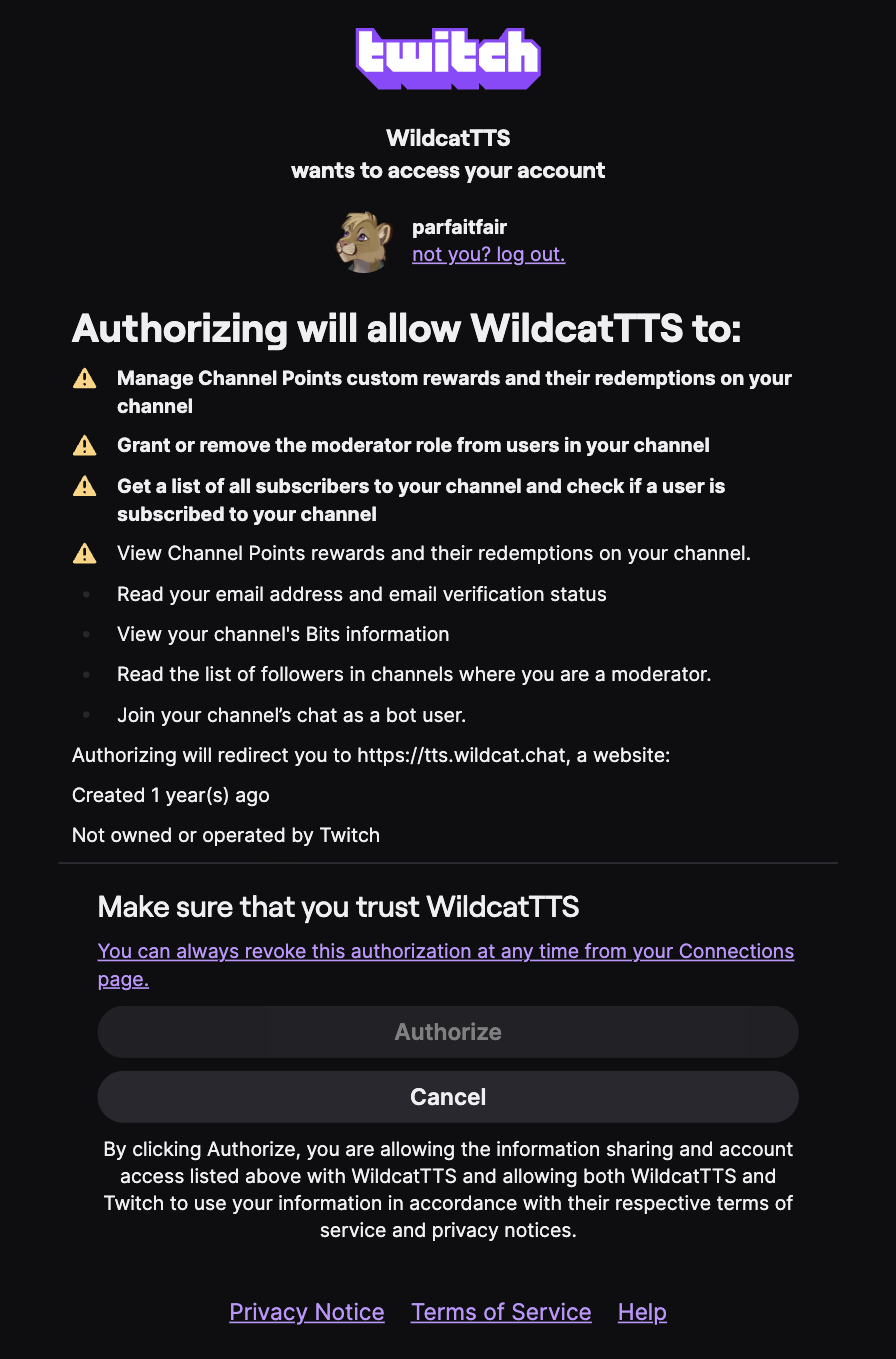
Twitch asks you to authorize the app. The permissions cover reading your chat, subs, bits, follows and channel point redemptions, creating a channel point reward on your behalf, and adding the bot as a moderator. Approve it.
-
You land on the dashboard. In the Channel service card on the right, click Activate TTS service.
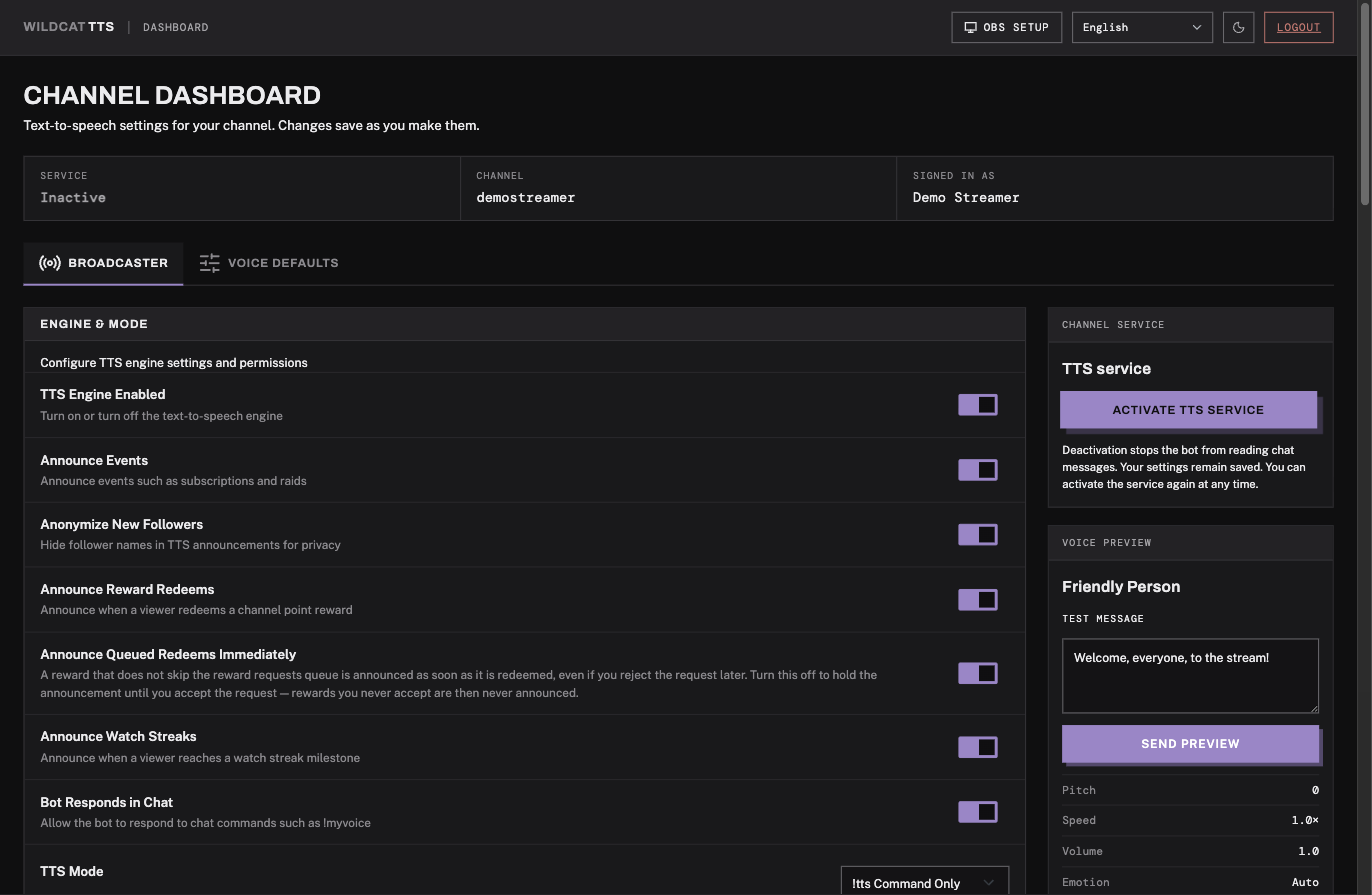
Signing in also makes the WildcatTTS account a moderator in your channel, so you do not have to mod it by hand. The bot shows up under “Chat Bots” in your viewer list.
Most settings on the dashboard save the moment you change them. The channel points card is the exception; it has its own Save button.
3. Put the Audio in OBS
The bot does not play sound on its own. It sends audio to a small web page, and OBS plays that page as a browser source. Nothing is heard until this step is done.
-
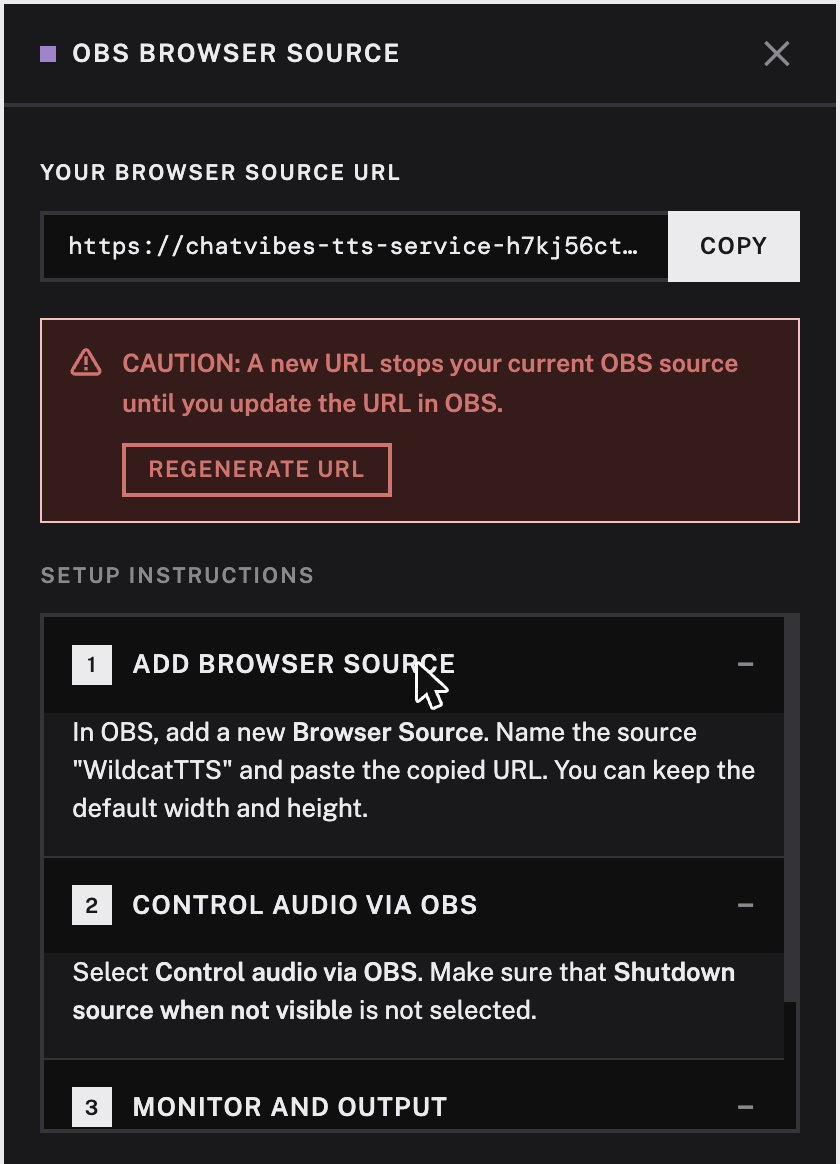
At the top of the dashboard, click OBS Setup, then Copy next to your browser source URL. This URL is private to your channel. Don’t paste it in chat or show it on stream.
-
In OBS, add a new Browser source and name it “WildcatTTS”. Paste the URL. Width and height do not matter for audio, so the defaults are fine.
-
Tick Control audio via OBS. Make sure Shutdown source when not visible is not ticked, or TTS will go silent whenever you switch to a scene that doesn’t contain the source.
-
In the OBS audio mixer, find WildcatTTS, click the gear, and open Advanced Audio Properties. Set Audio Monitoring to Monitor and Output. That means both you and your stream hear it. “Monitor Only” is handy while testing.
Now type !tts hello in your own chat. You should hear it.
If you ever think the URL has leaked, Regenerate URL in the same panel invalidates the old one. Your OBS source stops working until you paste the new one in the source properties.
4. Decide What Gets Read
This is the main decision. The setting is TTS Mode in the Broadcaster tab, under “Engine & Mode”. There are three options.

Read only !tts messages
This is how a new channel starts. Regular chat is silent. When a viewer types !tts I think you missed a chest back there, the part after !tts is spoken.
Right below it, TTS Permission decides whose messages count:
- Everyone
- Subscribers Only (subs, VIPs, and mods)
- VIPs Only (VIPs and mods)
- Moderators Only
This is the mode I’d suggest for a busy chat, or if sensory comfort is a priority.
Read every message
Choose All Messages. The bot reads each chat message as it arrives. This works well for a smaller chat where you can listen to everything.
The TTS Permission setting applies here too, so you can still limit speech to subscribers or VIPs.
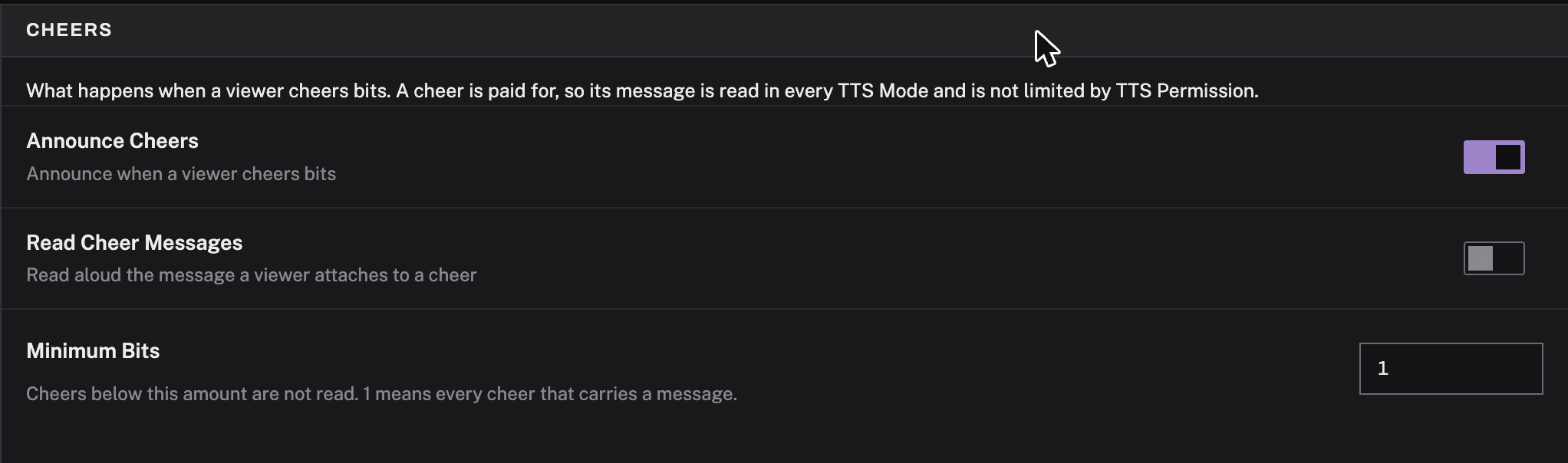
Cheers bypass this permission rule. Because the viewer spent bits, the bot reads their message even if they do not meet the permission tier. If you want to change that, turn off Read Cheer Messages or set Minimum Bits in the Cheers card.
If chat gets busy, raising the permission level can be better than turning TTS off. Viewers who would rather not be read can opt out with !tts ignore. You can also encourage viewers to use !myvoice in chat. It sends them a link to a web page where they can choose a voice and manage channel opt-outs. Mods can add anyone to the ignore list with !tts ignore add username.
Read only when someone spends bits or channel points
Choose Bits/Points Only. Regular chat is silent, and so is !tts. Two things trigger speech: a cheer with a message attached, and redemptions of a channel point reward, if you set one up.
For bits there is nothing to set up: a cheer with a message attached is read out. If you want a floor, set Minimum Bits in the Cheers card and cheers under it are ignored. Cheermote names like “Cheer100” are stripped before speaking, so the viewer’s actual words are what you hear.
For channel points, go to Channel Points → TTS:
- Turn on Enable Channel Points TTS.
- Give the reward a title (the default is “Text-to-Speech Message”), a cost in points, and a prompt the viewer sees when redeeming.
- Click Save. The bot creates the reward on your Twitch channel. You don’t have to make it yourself in the Creator Dashboard. If you already made one with the same name by hand, delete it there first, or Twitch refuses the duplicate.
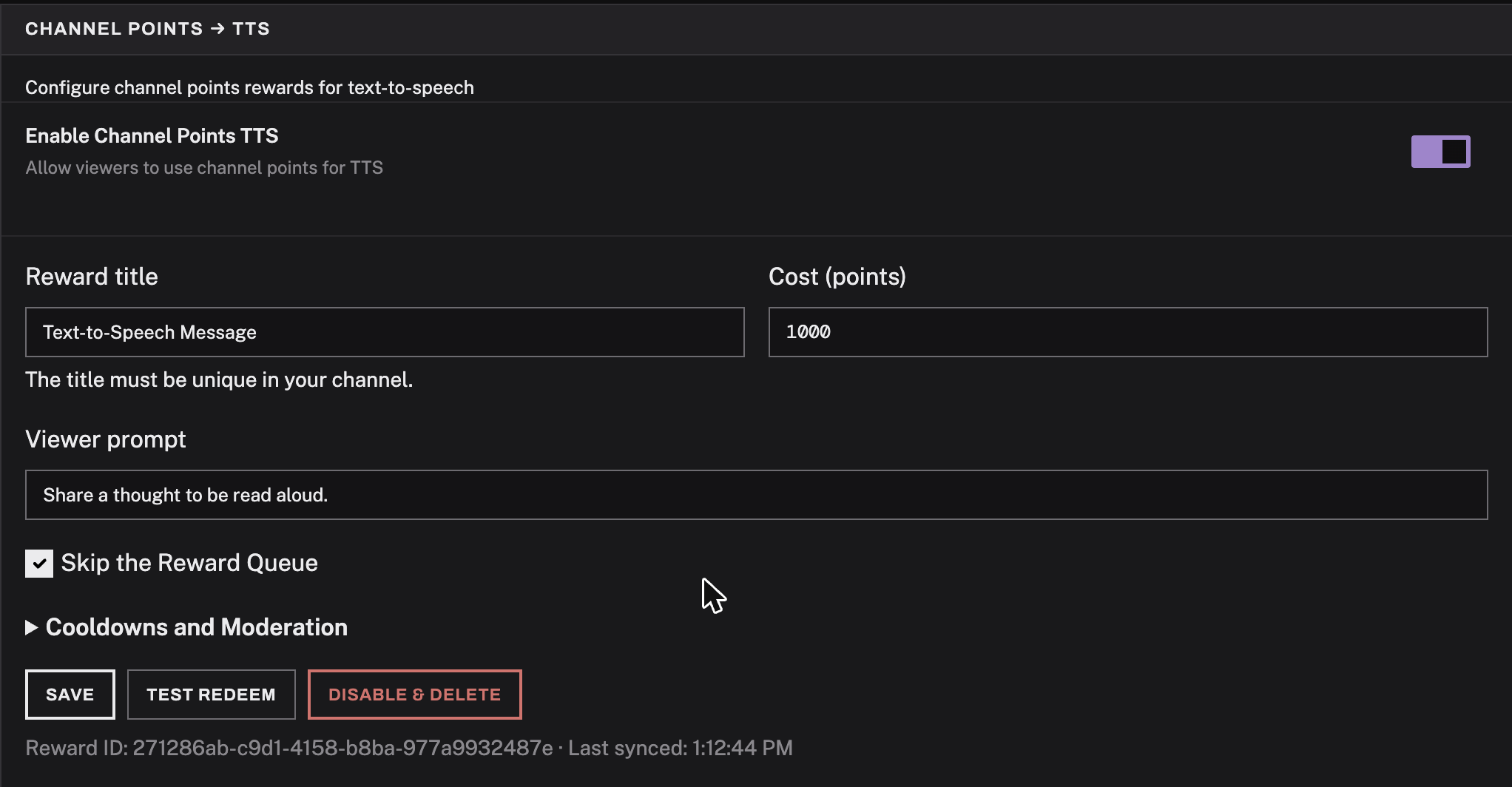
Whatever the viewer types into the redemption is what gets spoken. Links are blocked by default, and a redemption with a blocked link or a banned word is refunded automatically. Under Cooldowns and Moderation you can add a global cooldown and per-stream limits if the reward gets popular.
Skip the Reward Queue is ticked by default, which means the message plays the moment it’s redeemed. Untick it if you want redemptions to wait in your Twitch queue until you accept them. In that case, also look at Announce Queued Redeems Immediately in the Engine & Mode section, which controls whether the bot announces a queued redemption right away or waits for your approval.
Mixing them
The channel point reward works in every mode, so you can run All Messages or Command Only and still have the reward. Cheer messages are read in every mode too, since someone paid for them. If you’d rather they weren’t, switch off Read Cheer Messages in the Cheers card. In Bits/Points Only that switch is locked on, because reading cheers is what the mode is for.
5. Pick a Voice
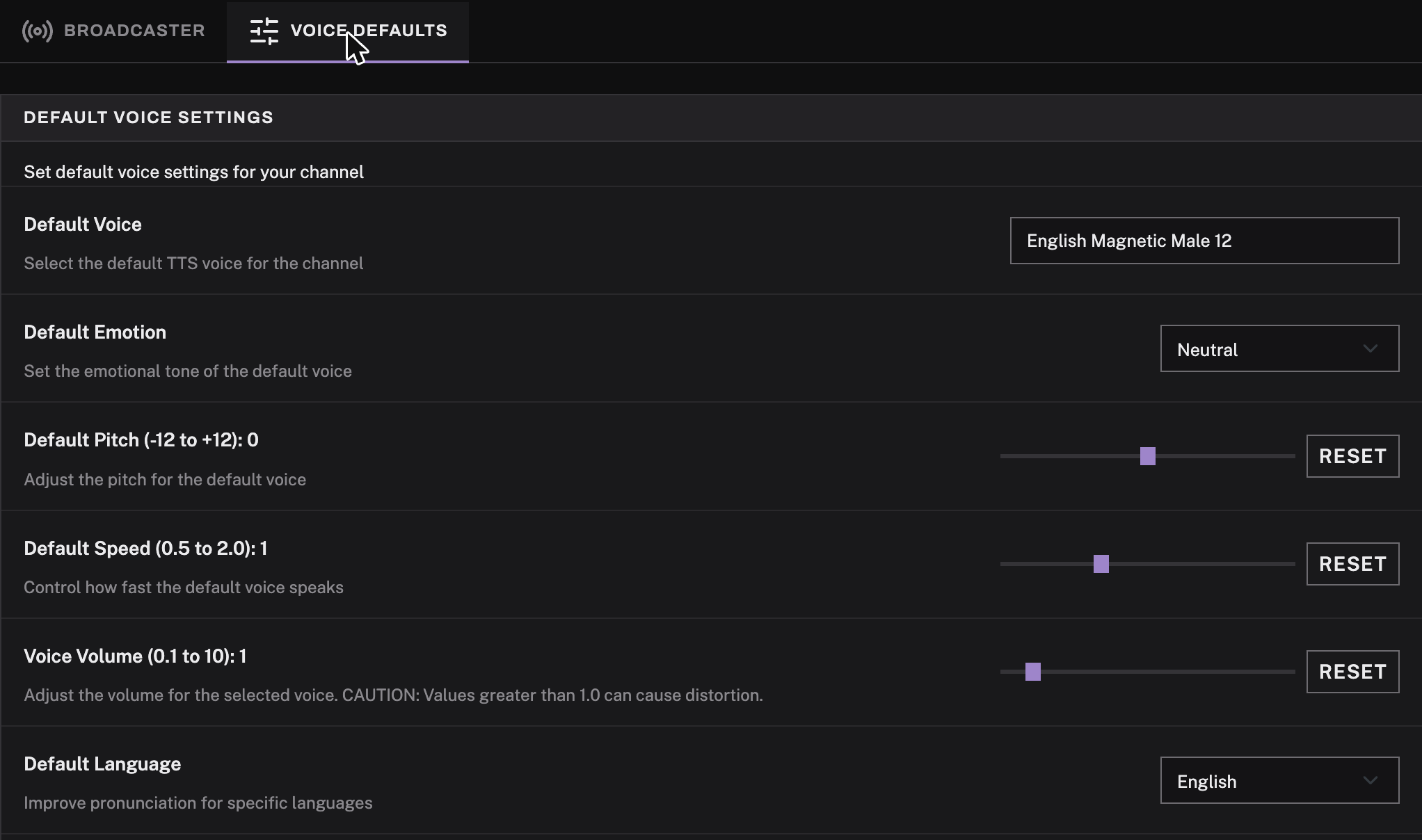
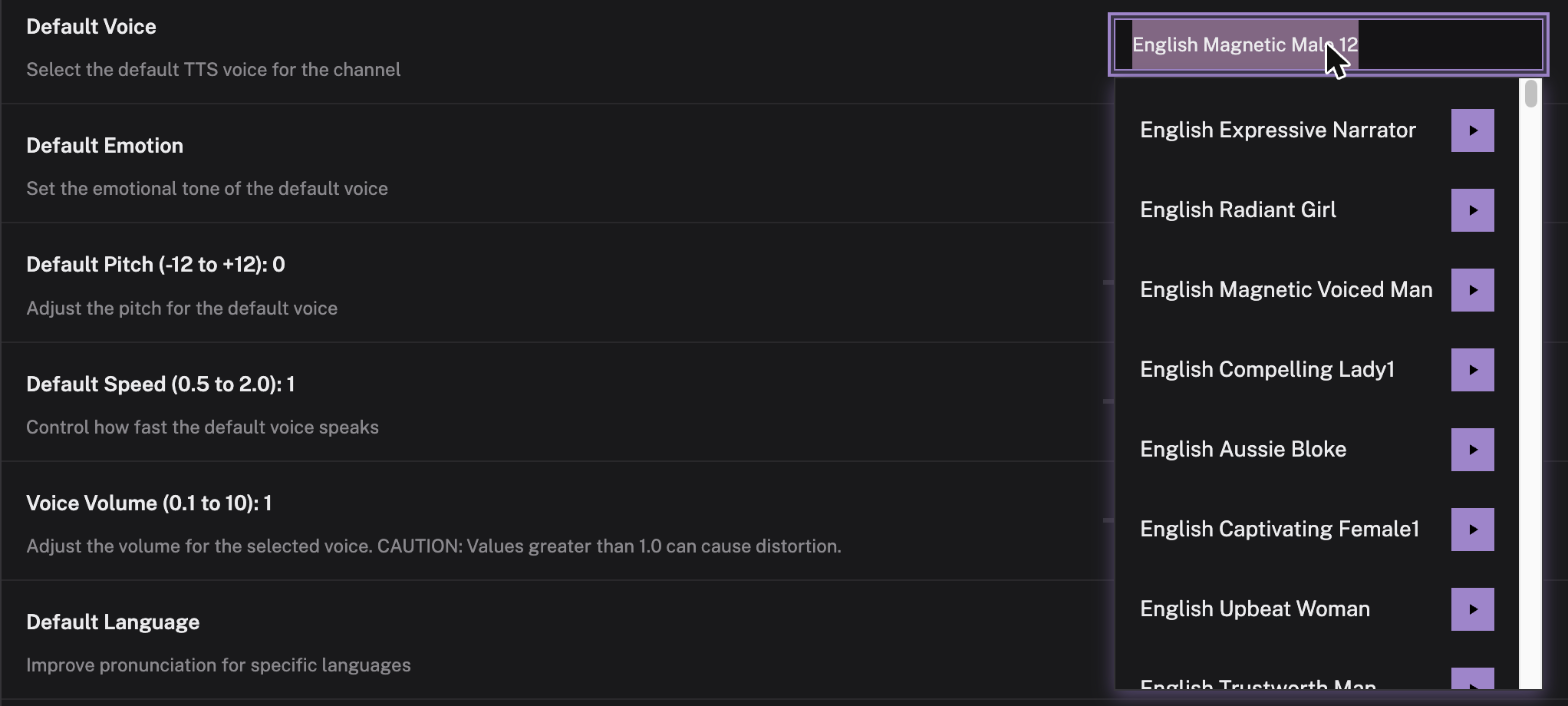
The Voice Defaults tab sets the voice your channel uses. There are 472 to choose from across 45 languages, each with a play button next to it so you can hear a sample before committing. The default is “Friendly_Person”. Pitch, speed, and emotion are there too. Type something into the Voice preview card on the right and click Send preview to hear the result with your current settings; that preview plays in your browser, not through OBS.
Viewers can pick their own voice. Typing !myvoice in chat gives them a link to the viewer settings page with your channel loaded. There they can choose a voice, pitch, speed, and language that follows them across channels. They can also manage channel opt-outs on that page. If you’d rather everyone sound the same, turn off Allow Viewer Voice Preferences.
If your chat isn’t in English, set Default Language so the voice pronounces things properly. The bot reads the language you declared on Twitch and fills this in for you if you never touch it, and announcements come out in that language too. There’s more on that in the 40 languages post.
6. Things That Are On by Default
A few behaviors are switched on from the start, and it’s worth knowing about them before your first stream so nothing surprises you.
The bot announces subs, resubs, gift subs, raids, cheers, and follows. Follows are anonymized (“Someone new just followed”) unless you turn that off. Each of these has its own toggle in the dashboard (the cheer one lives in the Cheers card, the rest under Engine & Mode), and !tts events off turns all of them off at once.
The bot answers commands in chat, for example replying to !tts status with the current settings. If you’d rather it never post anything, turn off Bot Responds in Chat. TTS keeps working; the bot just stops talking in text.
About 70 chat acronyms are expanded before speaking, so ngl reads as “not gonna lie”. The profanity filter is off by default; turn it on in the dashboard or with !tts profanity block. Both are covered in the pronunciation and profanity post.
Commands You’ll Use Mid-Stream
!tts off            pause everything (mods)
!tts on             turn it back on (mods)
!tts mode all       enable all messages (mods)
!tts mode command   enable only !tts messages (mods)
!tts mode bits      enable only bits and channel points (mods)
!tts stop           cut off whatever is playing right now
!tts clear          drop everything waiting in the queue (mods)
!tts pause          hold the queue without losing it (mods)
!tts resume         let it go again (mods)
!tts status         what mode and voice are set, and how long the queue is
Anyone can !tts stop their own message. Mods can stop anything.
If Nothing Happens
Work through these in order. The first three cover most cases.
- Is the OBS browser source in your current scene, unmuted, and set to Monitor and Output?
- Type
!tts statusin chat. If the bot doesn’t answer, it isn’t in your channel yet. Check that Service at the top of the dashboard says Active, and type/mod WildcatTTSin chat to be safe. - If it answers but says the engine is off, type
!tts on. - Check the mode. In Command Only, regular chat is meant to be silent. In Bits/Points Only, so are cheers below the minimum.
- If you regenerated the browser source URL at some point, OBS still has the old one.
The full documentation has every command and setting, and the troubleshooting section covers the rarer cases. If you’re stuck, get in touch.